Transitioning to Google Analytics G4

As many of you know, Google is discontinuing support for Google Analytics Universal on July 1st, 2023 and will only be offering support for Google Analytics G4.

To ensure that Arctic can continue sending over data to your Google Analytics account, you will need to complete the transition to G4 prior to July 1st.

To do this you will need to convert your existing Google Analytics Universal properties over to G4 properties within your Google Analytics account or set up new G4 properties for your Google Analytics account. You will also need to change your Arctic guest-facing site to use G4.

Enabling G4 on your guest-facing site within Arctic is a simple and straight forward process. To enable G4 go to the “Settings” page under “Guest-Facing Sites” and click the “Pencil” next to “Manage Guest-Facing Sites”.


On the “Browse “Guest-Facing Sites” screen, click the “Settings” button.


On the “Guest-Facing Site Settings” screen select “G4 (gtag.js)” from the “Google Analytics Format” drop down menu.


If you are using a subdomain guest-facing site implementation, you will also want to enter your new G4 property id in the “Google Analytics Tracking Account ID” field.


Note: The “Google Analytics Tracking Account ID” field will not appear if you are using an IFRAME guest-facing site implementation. If you are using an IFRAME guest-facing site implementation, you will need to be sure the new G4 script is installed on your main website and particularly is installed on the page your IFRAME is embedded in on your site. Arctic will access this script to access your Google Analytics tracking account ID.

Once you have selected “G4 (gtag.js) from the “Google Analytics Format” drop down menu and, if applicable, entered your “Google Analytics Tracking Account ID” scroll down and click “Save Settings” to save your changes and update your guest-facing site to use G4.

If you have multiple guest-facing sites, you will need to complete the above steps for each guest-facing site that you have.


IMPORTANT: Again, if you are using an IFRAME guest-facing site implementation you will also need to be sure the appropriate G4 script is installed on your main site and especially applicable on the page the guest-facing site IFRAME is embedded on. This will be something either you or your web designer will do. If you do not install the appropriate G4 script on your main site, your guest-facing site WILL NOT report to your Google Analytics account.


If you have any questions or concerns about switching your Arctic guest-facing site over to use G4 please feel free to contact us. We are always happy to help.

NOTIFICATION: Arctic Notifications Are Here

Holy cow! Does that say what I think it does?! Arctic Notifications!

Yes, you heard right. Arctic has launched a new notification feature so the system can alert you to new online actions. TA DA! 🥳 (Cue the trumpets, applause, gasps of amazement and the heavenly host choir. ) 

So exciting!

The new notification feature allows you to set up email notifications for yourself and/or your staff so it can send you alerts to about new online actions such as reservations, rentals, inquiries, payments and e-commerce orders as well as alerts for expiring activity holds.

Note: The notification options available will be dependent on the features you are using and have enabled on your installation.


You also can tell the system when you would like to receive notices and you get to choose for which events you would like notices. For example, you can decide you want notices all the time or you only want notices outside of your business hours when you will be out of the office. Or if you want to get notices for just online reservations. Or if you only want notices for expiring holds the day trip business group and notices for all e-commerce orders no matter which business group they are associated with.

The notification settings are very modular so you can be sure to only get the notices you wish to get when you wish to get them.

Also Note: The option to specify when to send notices will only show if you have specified business hours for your installation. 


To access this new marvel of communication and intelligence, simply click the “User Menu” (psst. . .it’s the drop down button with your name on it) in the “blue bar” at the top of your installation and select “Notifications”.


Once in the notification settings, all you need to do is decide when, what, and for which business group. Your personal notifications can always be modified through the “User Menu” which gives you complete control over how the system will send you notices.

Admins can also set up notifications for other users in the system. To do that, you simply go to the user’s “View Person” page and click on the new “Notifications” tab.

This is handy if you want to be sure some of your staff is getting alerted to important online actions.

All notifications are emailed to the user’s “user email address”. This is the email address they use to login. If you use personal email addresses for user login access, then the notices will go to your and your staff’s personal email addresses.

For more information on this fabulous new feature, check out our support documentation or feel free to contact us at support@arcticreservations.com and we will be happy to help.

Authorize.Net Changes to Default Fraud Settings Results in Failed Transactions

For those of you who use Authorize.Net, it has recently come to our attention that Authorize.Net has made some changes to their default fraud settings. These changes have led to an increase in failed transactions with the message that the transaction is being held for review by the processor.

When this response is returned by Authorize.Net, Arctic views it as a failure because it cannot know if the transaction will be approved or rejected.

Since Arctic views the response as a failure, you must wait to see if the transaction is approved or approve it yourself through your Authorize.Net gateway account. If the transaction is ultimately approved, you will then have to record a “manual” payment on the invoice for the amount of the now approved transaction to be sure the invoice is credited with the payment.

Essentially, you have to treat these transactions as though you processed them directly through your Authorize.Net accounts rather than through Arctic.

This response has, in the past, been a rare occurrence and usually indicated a guest’s issuing bank had limits or additional approvals that were required for certain types of purchases. However in recent weeks, we have noticed an uptick in the number of transactions both from the backend and the guest-facing side that are being held for review. This can lead to trouble tracking the missing transactions when they are ultimately approved through Authorize.Net and can make it difficult for guests to process payments online.

In our investigations we found the reason this response is being returned more often is due to some recent changes Authorize.Net has made to their default fraud settings. There are several adjustments recommended to keep transactions from being held for review. The following image details the various changes recommended and suggested best practices for ensuring you have the proper filters for your needs enabled.


If you are a Path Payments customer, Adam Callaway has made himself available to help you make any needed adjustments to your Authorize.Net gateway or to answer any questions you might have. If you are not a Path Payments customer, you can reach out to your merchant service provider of choice or Authorize.Net directly to ask for guidance on how to adjust your filters to ensure the transactions processed through your gateway are processed rather than held for review.

Again, when the “transaction held for review” response is received, Arctic will view it as a failed transaction. It will be logged with the other transactions made on your gateway and can be viewed on the “Browse Credit Card Transactions” page. To access the “Browse Credit Card Transactions” page, go to the “Reports” menu and choose “Manage”. On the “Browse Reports” page, select the “Filter” tab and then click “Browse” in the “Credit Card Transactions” section of the page.

If the transaction is approved through your Authorize.Net gateway after it has been reviewed and appears on your batch statement, you will need to record a “manual” payment on the invoice to reflect the payment made.

You can read more about applying manual payments to invoices in the following support documentation: Taking Payments

If you have any questions about transactions that have failed due to the “transaction held for review” response or how to properly record them after they have been approved through Authorize.Net, please feel free to contact support and we will be happy to help.

All questions about how to make the needed adjustments to your Authorize.Net account will need to be made to your merchant service provider or directly to Authorize.Net’s support. Unfortunately we cannot provide direct guidance for these adjustments.

Online Gift Certificates Are Here! Hurray!🎉 

That’s right. Arctic has recently launched a new online gift certificate feature that will allow you to sell gift certificates to your guests online. This new feature is available with any edition of Arctic and does not require the use of the retail module although it integrates nicely with the retail module e-commerce features.

The new online gift certificate feature allows you to create gift certificates for set amounts that your guests can then purchase through the guest-facing site.

Guest-Facing Site Purchase Interface on Installation w/o Retail Module

Guest-Facing Site Purchase Interface on Installation w/ Retail Module

For all online gift certificates that you create you will be able to set an image, an amount, and specify whether the gift certificate should expire. You can also specify a business group for the gift certificates which will allow you to control which guest-facing sites they are offered on (only applicable if you have multiple guest-facing sites) and also allow you to track their sales by business group if you would like to distinguish them a bit further.

It is important to note that even though, you can assign an online gift certificate to a specific business group that its business group assignment will not limit what it can be redeemed for. It will still be able to be redeemed for any offering you have. Just like the gift certificates you generate on the backend. In Arctic, all gift certificates, whether online or backend, are treated as a payment method and are therefore available for redemption in any payment context.

The online gift certificate feature is designed around the idea of delivering a guest’s gift certificate purchases electronically. Yay! Less paper and plastic in the world! AND, more importantly, less effort on your part as this process could be entirely automated with the inclusion of the gift certificate syntax in your “Order Confirmation” email templates. You could also create a pretty printable option for each gift certificate purchased that could be emailed by using the “Gift Certificate” email template. These options make handling gift certificate purchases simple and easy as well as planet friendly. 🤓🌏

While electronic delivery is the only option available for installations without the retail module, physical delivery options can be offered on installations that are using the retail module e-commerce feature.

You can read more about the new online gift certificate feature in the Gift Certificate chapter of our support documentation. The documentation explains how to create and purchase online gift certificates. It also provides details on the available delivery options and how to configure them.

If you would like to use the new Online Gift Certificate feature, let us know and we will be happy to enable the feature for you. And as always if you have any questions or concerns don’t hesitate to contact support.

A message for you, sir. . . 

In this latest round of updates, you may or may not have noticed in the midst of all of your cleaning and sanitizing, that we recently added several new guide email options for your trips and a nice new email receipt option for the retail module.

The guide emails are pretty awesome and greatly expand upon the options you have for communicating trip and schedule information to your scheduled guides.

The first new guide email is the “Email Trip Guides” email template. This template is designed to be able to send a “guide” oriented email to the guides scheduled on a trip. These emails can include basic trip information as well as guide schedule information like their position on the upcoming trip and any additional schedule notes you might have added for a specific guide when you scheduled them. These emails are manually sent from the “View Trip” pages as shown here:

As with most of the email templates available in the system, you can create multiple “Email All Guides” email templates and select the appropriate template when preparing the emails from the “View Trip” pages.

To add a new “Email All Guides” email template to your system, go to the “Email” menu and choose “Templates”. On the “Browse Email Templates” page scroll down to the “Email All Guides” section and click the “+Setup Template” button as shown here:

In addition to the “Email Trip Guides” email template, we have also added two new trip triggers that are also specific for the guides scheduled on trips. They are the “Before Trip – Guides” and the “After Trip – Guides” email triggers. These triggers can be created to automatically send your guides emails about their scheduled positions and trip information before the trip and also send post trip reminders, if needed, for anything the guides need to be reminded to do after they return from a trip.

These triggers work just like your other “Before Trip” and “After Trip” triggers. The only difference is they are sent to the scheduled guides on your trips. Guests do not receive these emails.

To create “Before Trip – Guides” and “After Trip – Guides” email triggers, go to the “Browse Email Templates” page  then scroll down to the “Triggered Emails” section of the page and click the green “+Add Trigger” button to select either the “Before Trip – Guides” or “After Trip – Guides” option as shown here:

Note: In order to use the guide email templates and triggers, you must be scheduling your guides on the trips. If you are not scheduling your guides onto the trips, you will not be able to use these templates.

Along with these wonderful new guide email options, we have also added the ability to email receipts from the point of sale terminals of the retail module. The Point of Sale Receipt email option will make it easy and efficient for you to provide a guest with their retail receipt without having to print it. Save equipment and save paper. It’s a win win.

The email option for sending the receipt is presented at the end of a transaction either on the “Make Change” window for cash transactions or when the “Receipt” window is displayed after credit card transactions are processed.

You do not have to have a customer selected for the retail transaction to be able to use the email receipt feature. You can just type in the customer’s email address in the provided email field and send an email receipt.

There is a nifty nuance to the email receipt feature when a customer make their purchase with a credit card. When a guest uses a credit card with you for a purchase and chooses to have you email their receipt, if they come back and make additional purchases using with the same card, Arctic will be able to retrieve the email used previously to send the customer their receipt, so you do not have to re-enter it for each purchase they make. Again, this does not require you to select a customer for the transaction for Arctic to be able to retrieve the previously used email address for the customer’s receipt. (Super cool, right? 🤓)

Arctic provides a basic email receipt template but you can customize its content if you desire. To do so, return to the “Browse Email Templates” page and locate the “Point of Sale Receipt” section and click the green “+Setup Template” button.

Note: You can only create one “Point of Sale Receipt” email template per business group.

If you have any questions about or run into any hiccups getting these new emails configured let us know and we will be happy to help.

Gotham’s New Coodie Fighting Heroes: Kicking Butt & Taking Names

Before this year, we thought about germs but not like this. And who ever thought there would be such a thing as a nation-wide toilet paper shortage? I mean seriously. 😳 But I digress. . . .

In this new world that has been rudely thrust upon us, we are all looking to maintain our fight against the nefarious coodies that have wreaked so much havoc. For you, as outfitters, that has meant changing how you do business and one important aspect of that is how to reduce as many “touch” points as possible. 😷

To help kick coodie butt, we added a new superhero to our lineup. The new hero is unassuming and mild mannered like all great superheroes but packs a pretty good wallop. If you have been watching our Twitter feed, you saw its arrival heralded as a way to achieve contactless check-ins. That’s right, Batman has entered the building. 🦇

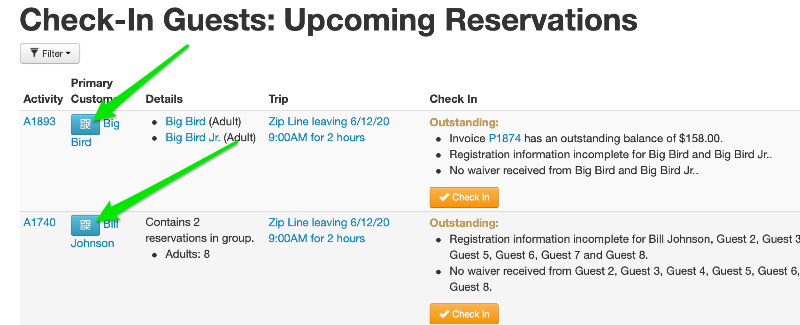
Our new Batman is a button that adds a QRCode to the Check-in page for any reservation or rental that has missing details, i.e. waivers or registration forms. The code can be scanned by the primary customer of the reservation or rental to access their guest-facing site from their own mobile device where they can complete any missing forms needed for themselves or their group.

The beauty of this is it is 100% contactless, simply show the check-in screen to the guest with their QRCode exposed and voila, they have access to their guest-facing account on their own device. No need for you to offer your own devices or paper and pens to get the guests to complete their forms. Think of all the touch points you just saved. Not to mention how many trees. You get to be coodie free AND environmentally conscious. 🤓 Go QRCode Batman!

If the reservation has multiple forms missing, the primary guest can either pass around their device to their adult group members allowing each of them to complete their own forms. Or they can invite their other group members to register which will allow those guests to complete their forms on their own devices.

While the guests complete these forms, you can ask them to step aside and check-in the next guest. Since the forms are on their own devices, the guests don’t have to stand at your check-in desk to complete them which will give you the ability to spread out check-in stations to help with social distancing.

Our QRCode Batman makes the Check-in page its very own Gotham. Keeping tabs on and rounding up all of your wayward guests until they are safely checked in and ready for adventure.

(If you have never used the Check-in Feature before, you can find out more about it here.)


While the QRCode is the Batman of our superhero alliance that delivers the knock out punch for the contactless check-ins, we can’t forget the other members of this powerful team, Robin and Batgirl aka. the Before Trip – Missing Details and Before Rental – Missing Details email triggers.

These two side kicks hang out in the Batcave tracking down any guests who might stray from the straight and narrow, saving as many as possible before they get to Gotham’s streets for Batman to round up.

When properly deployed, our trusty entourage make Batman’s job easy, keeping the number of guests he has to save at the last minute to a minimum.

By repeatedly reminding guests who are missing forms, i.e. registration or waivers, to complete them before their arrival, Robin and Batgirl can rescue all but the worst procrastinators among your guests.

The more you deploy them before your guests arrive the more likely you are to reduce the number of guests Batman has to handle.

In an ideal world, Robin and Batgirl will save the day before you ever get close to Check-in. But, they can only do that if you allow them to exercise their greatest power, the power of nagging.

That’s right. Nagging. Robin’s and Batgirl’s job is to nag your guests into submission. But the full extent of their powers is only spent upon those die-hard procrastinators who just refuse to even think about completing forms before their arrival. This means there is no need to worry about their powers adversely effecting the guests who were brought into line with a single reminder because these guests will then be spared from further attention. Batgirl and Robin will only focus on those guests who have not completed their forms.

You can read more about deploying the power of the Before Trip – Missing Details and the Before Rental – Missing Details email triggers in our blog post “The Great Procrastinator Hunt“.  It explains the full extent of the power available to these two triggers and how to make the most out of them. Remember their greatest power is the power of nagging so deploy them often.

Like all great alliances, our superhero alliance is strongest when they work together. You get the most coodie butt kicking benefits by using them as a team.

Batman shouldn’t be tasked with trying to get all of your guests to complete their forms on the day of their arrival. Let Robin and Batgirl help reduce his workload by sending them out among your guests before they arrive. You can even let them wield their power on the day of the guest’s activity by setting the triggers to go 0 days before. Never underestimate the power of a good nag. 😎

If you keep the alliance strong, you will have won a major battle in the war against coodies and achieved a contactless checkin that is efficient and effective.

It’s Spring Again!

It is that time of year again when we roll out several new features. The first feature being launched this spring are the new Collapsable & Conditional Form Fields. These fields will allow you to keep certain fields hidden until the heading is clicked or to keep certain fields hidden unless a specific answer is received from another defined field. For some of you this is really going to improve your guest registration process as you will be able to control the questions asked based on the answers received. On the backend, the Collapsable fields are going to be great for keeping your backend forms more streamlined by allowing you to only expose certain fields when they may be applicable and otherwise have the hidden under a nice section title. This feature takes only a little time to describe but it will greatly change and improve the way you manage your forms in Arctic. To read more about the new Collapsable and Conditional Form Fields check out the support documentation.

The next features that have been added this spring are some exciting new email options. First, we have added a “Shipping Confirmation” email template that you can now send to e-commerce guests with their tracking details.


Also on the email front we have added Rental Item placeholders. The new Rental Item placeholders will allow you to access specific rental item information within a guest’s rental to provide them with more detail about the items they have rented. These new rental item placeholders are found in the “+Add Placeholder” menus of Invoice, Rental Details, and Order Confirmation email templates, as well as in the Before Rental & After Rental email triggers.

Along with the new Rental Item placeholders, there is also an new Advanced Logic placeholder that will allow you to cycle over all of the items in a rental to provide specific rental item information to your guests for each item they rented. The new Advanced Logic is available in all of the same templates and triggers where you will find the Rental Item placeholders.

We are also announcing beta testing for our new Trip Form feature. The Trip Form feature is an entirely new feature that will allow you to create any forms you would like to have completed by your staff in regards to your trips. These can be pre or post trip forms and can be completed by any user in the system with “User” access or above. Responses can only be viewed by users with “Super User” access or above. If you are interested in exploring the new Trip Forms as a beta tester, please contact support and we will be happy to provide you with additional details.

And as always, if you have any questions about the new features or need anything else, please feel free to contact support we are always here to help.

Trip Tools to Make You Sing

We have added a few new features to our arsenal for managing trip inventory and availability. Well, I say new, the reality is we have had them for a while now but they are easily overlooked and we don’t want anyone to miss out on these great new features. There are three in total, trip equipment, capacity for add-ons, and a new online minimum setting.

Tool #1: Trip Equipment

We’ll start with trip equipment. Trip equipment allows you to assign equipment like vehicles to trips on the fly. Meaning you can go to an individual trip date and add equipment just to that trip. This is great when you need to assign specific vehicles to trips for pick ups and drop offs. It is also great when you want to keep track of which specific equipment should be used for a particular trip, i.e. vans 1 and 3 but not 2. And best of all you have the added benefit of knowing that Arctic will help you ensure that you don’t end up overbooking a piece of equipment trying to use it in two places at once.

To use this feature, you first add the individual pieces of equipment to your “rental” inventory just like you do for the inventory associated with your add-ons. Once the equipment has been added, you can go to the “View Trip” page for the trip you wish to assign the equipment to and click the “+Add Item” button found in the “Equipment” box at the right of the page.
In the “Create Trip Equipment” window, you will then be able to select the equipment you wish to use and then set the time for which the equipment should be allocated. For example, if you are adding a vehicle for the trip drop off which will take the driver 2 hours round trip to execute. You will configure the window as shown here:


Note: Arctic will automatically fill in a “Start” and “End” that corresponds to the trip’s start and end. However you can modify this so the equipment is only allocated for as long as you need it, freeing it up for use for other trips. This is especially handy for managing your fleet of vehicles.
You can add as many pieces of equipment as you need for a trip and set  allocation times according to how each will be used for the trip. Once equipment has been added, Arctic will show each item along with its allocation time in the “Equipment” box. You can easily remove or edit any of the equipment selected by clicking either the “Pencil” to edit or the “x” to remove.
Tool #2: Capacity
Next up is the new capacity feature. The capacity feature is available for use with add-ons and is found on the add-on form.

Capacity allows you to set a per trip capacity for add-ons. It can be used with both add-ons with associated inventory or add-ons without associated inventory.

The capacity box allows you to tell Arctic that only x amount of a particular add-on are available for any given trip. This works great for options you need to limit on a per trip basis. For example, if you can only take up to 3 triple kayaks on a trip due to loading logistics or you can only offer fishing to 2 guests per trip due to permit restrictions.

For add-ons with associated inventory, capacity is just another level of control at the trip level. For example, going back to the triple kayaks, you might have 15 triple kayaks in your available inventory but that doesn’t change the fact that you can only take 3 on any given trip.  With the capacity set to 3, Arctic will ensure that only 3 of the triple kayak add-ons can be added to a specific trip even though you have inventory that would allow 15 triple kayaks to be selected.

For the fishing example, which doesn’t have any inventory associated with it and is simply a permit constraint, you can enforce a limit per trip without having to set up an unnecessary inventory item to manage the spaces available. Capacity is quickly becoming one of my favorite new tools. It’s awesome.

Tool #3: Minimum Guests for EACH Reservation
The last new tool in the trip tool arsenal is a new online minimum setting. It is the “Minimum Guests for EACH Reservation” setting. This new setting allows you to add a minimum number of guests per online reservation. This is great for trips that need reservations to have a minimum number of guests no matter whether the trip is open or not. The new setting is found on the “Online Reservations” tab under the “Minimum Guests for the FIRST Reservation” which is the setting that allows you to tell Arctic how many guests are needed to “open” a trip to ensure its profitability.


If a guest’s reservation doesn’t meet the minimum set for EACH reservation, then Arctic will allow them to submit an inquiry. As with the minimum for the FIRST reservation, Arctic will allow you to choose whether or not to convert the inquiry into a reservation even though it doesn’t meet the minimum. This gives you the flexibility to ensure that only reservations with the correct minimum are what is being booked online while also allowing you to approve reservations that might fall outside the set guidelines.

Now that you know about these great new features, I expect to hear some beautiful singing at our next karaoke night. (Who wants the mic 🎤 next? 😎) And as always, if you have any questions about how to implement these new tools into your operations, let us know. We are always happy to help.

Authortize.Net Disables ECC

For all of our Authorize.Net users, we recently were made aware that in late June 2019, Authorize.Net disabled Expanded Credit Capabilities (ECC) for all of their users.

What this effects in Arctic is your ability to process unlinked refunds for credit card transactions that are older than 90 days. ECC must be enabled on your Authorize.Net account in order to process unlinked/blind refunds for credit cards.

According to Authorize.net you can re-apply for ECC using the following steps via Authorize.net

The following is from Authorize.Net directly and explains the process for reapplying:

To apply for Expanded Credit Capabilities (ECC):

  • Click ‘Contact Us’ at the top of your page
  • Click ‘Support Cases’.
  • At the top of the page, click ‘Support Cases’ again.
  • Look under the section titled ‘Create a Case’.
  • Click ‘Apply for ECC’.
  • Agree to the terms.
  • Answer the questions.
  • Submit your request.


We are only enabling the ECC feature for merchants, who require this service, due to specific circumstances. So if you apply for ECC, please describe, in detail, the specific business policy, process, or situation, or the specific software requirements, that make this a required feature for your business, so that we can then further review the request.


Also in order to process your request, we will need one of the following items to validate your request:

  • Copy of a government issued identification card (Driver’s License, etc.)
  • Copy of IRS Form SS-4
  • Voided check showing the merchant name and account number
  • Copy of utility bill showing the merchant name and/or merchant address
  • Copy of a credit card statement showing the merchant name and/or merchant address
  • Notarized letter that properly identifies the individual submitting the request
  • Letter from a bank identifying the individual and listing the bank account number
  • A copy of Articles of Incorporation or Articles of Organization (and if non-profit, IRS proof of non-profit status

Please attach one of the above options to the application after you create it.


If you have any additional questions, please feel free to contact support and we will be happy to help.

Testing. Testing. 1, 2, 3. . .

Have you ever been training someone or even trying to look at a new configuration you put into place in Arctic for the guest-facing site, and wished and longed and hoped for a way to make test reservations through your guest-facing site that didn’t require a bloody payment? Have you silently cursed in frustration as you finally with great reluctance entered your own personal card details or that of the company to be able to complete a test purchase, then frantically rushed into the backend of Arctic to void the charge? Or worse forgotten to void the charge? 🤦‍♀️

Well, I’m gonna let you in on a little known feature that will end all of your testing misery and fulfill all of your wishes, hopes and desires. As an Arctic user you can test the guest-facing site experience all the way through checkout without needing to make a payment. 😱

We have a feature that allows any backend Arctic user to access the guest-facing site to make test reservations and transactions without needing to also process a payment. The feature recognizes the fact that you are an Arctic user and will give you an option to “Pay Later”.

No, I am not kidding. No, it is not witch craft. And no, it is not new. But it is easily overlooked.

How do you access this magical feature, you ask? Well, first you have to open a tomb, fight some scary, overly large scorpions and snakes, and then escape some enchanted booby traps to get to the secret chamber where the magic lamp is hidden. Once you find the lamp, you have to rub it three times counter clockwise. Trust me, you do not want to know what happens if you rub it clockwise. . . Oh wait. Those are the instructions for summoning a genie 🧞‍♀️. Sorry, about that. Wrong book. We need the book of Arctic secrets not the book on fabulous fantastical creatures and how to summon them.

Ah, here we are, page 29.1, to access the guest-facing site and be able to skip payment, go to the “User Menu” with your name on it in the upper left hand corner just under the Fox and select “Access Guest-Facing Site.”

When the guest-facing site is accessed through the “User Menu,” Arctic will know that you are an Arctic user and will give you the option to “Pay Later” so you can complete all test transactions without having to provide an actual form of payment. I know, mind blow right? 🤯