Analyze This & Track That

Have you ever wondered about the path your guests take on their journey through the vastness of the internet until they land on one of your tours? Or wondered which ad campaigns were the most effective at reaching your particular market and clientele? Sometimes these two questions can seem almost as impenetrable as pondering the source of life in the vastness of the vacuum of space or the even harder one of what to have for lunch. 🤔

To help you find the answers you seek, Arctic supports the use of analytics code and conversion tracking code which are designed to give you valuable metrics so you can make good decisions about how your website might need to be revised to maximize its efficacy or where you are getting the most bang for your advertising dollars.

Analytics code is designed to track your guests throughout their interweb journey, keeping up with how they arrived at your website following the meandering path they took while on your site through their final checkout. This data can be invaluable to understanding how your guests are getting to your website, how easily they can find the information they need to make a decision, and how easy it is for them to complete a booking. Analytics can also help you track the revenue generated through your website, conversion rates (i.e. the number of users that actually complete booking), what is being booked, and so much more.

Conversion tracking code provides you with invaluable data regarding how effective a particular ad source, like Facebook or Google Adwords, is at reaching your particular market. Such code can tell you about conversions directly linked to the ad source and, depending on the code provided by the vendor, can also incorporate revenue figures, all of which helps you make the most informed decisions about how best to reach your customers.

The analytics code and conversion tracking code are generally provided to you by your analytics or ad vendor respectively. Once you have the code, you or your web designer can easily integrate them into your Arctic installation and guest-facing site. Arctic has a full set of tools that makes doing so simple and straight forward.

Once the code is installed and merrily pumping out data, clearer answers to those large impenetrable questions will start to emerge. Well, at least the ones about your websites and ad campaigns. The ones about the source of life or what to have for lunch will still be pretty murky. 🙃

As always, if you or your designer has any questions about installing analytics or conversion tracking codes, please let us know, we are always happy to help. And if you ask nicely, we might even throw in some suggestions for lunch but you’re on your own with the source of life. That one is totally outside the realm of Arctic support. 😉

It’s Spring & Features Are Blooming!


OMG! Can you believe it? We are already in March and have leapt forward into daylight saving time! Looking at all the snow we have gotten everywhere it seems like the upcoming rafting season is going to be pretty epic and that the current snow season has had some serious powder to play with. We are super excited that Mother Nature has decided to bless us all with her bounty, especially out west where she has been stingy for a while.

As some of you transition into a new season of stellar fun and others are winding down or trading hats, we wanted to be sure you stopped and smelled the features.🌸 We have several new features that have blossomed in the last several weeks and we don’t want you to miss their awesomeness.

Let’s kick off our garden tour with the new email features. The email features are full of blossoms this year. We have added two new email triggers to the trigger line up and some nice little enhancements to add to the great email tools Arctic already has in place.

The first new trigger is an “After Rental Created” email trigger so you can have emails automatically sent to clients after making a rental. We also have a new “After Payment Received” email trigger. The “After Payment Received” trigger can be sent automatically for payments received online, via the backend or both. It’s a great way to send your guests a receipt or acknowledgement of a payment received. This trigger will automatically include an updated copy of their invoice as well for their reference. How awesome is that? No more answering questions about whether or not you received a payment. Arctic will preemptively answer them for you. 🥳

Also in the bloom of email features is a new feature that allows you to suppress activity-related attachments from certain email triggers. This will allow you to be able to send automated emails to your guests without drowning them in attachments.

If you look deeper into the garden of new email features, you will see a couple of nice little enhancements. The first one is the ability to suppress trip related email triggers for last-minute reservations. So, if for example, a last-minute reservation should not receive one of your standard before trip email triggers, you can set the trigger to not send for new reservations. The next little nicety you will find is the ability to pull in past trip history into email templates with the new “Trip History” placeholder. You will also find that the evaluation links always work whether the evaluations have already been completed or not. Previously after a guest completed their evaluation, the evaluation link in their email would stop functioning. This caused some confusion for guests who forgot they had already submitted a response. Now, if an evaluation has already been completed when the guest clicks the link they will be able to see they have already completed the evaluation.

Email features are not the only things that have sprouted this year. There are some small but beautiful new blooms for the online waiver feature and the evaluation feature. In the online waiver garden, we have extended the time for online waiver completion. Online waivers can now be completed up until a trip ends. This allows you to be able to direct guests to complete their waivers online via their own devices should they arrive without having completed the waiver for their reservation.

And for evaluations, there is a new button to allow you to clear an evaluation response. If a guest would like to revise their evaluation, you can now clear their original response which will allow the guest to complete it a second time.  The button is accessed from the “View Response” page as shown here:

In our trip garden, we have a couple of awesome new features. The first allows you to add “trip specific” inventory to a trip. These are inventory items like vehicles, rafts, etc., that you want to track usage for, but do not constrain guest availability, so can be manually added at your convenience. If you are interested in using the new “Trip Equipment” feature contact support and we will be happy to enable the feature for you and explain how to use it.

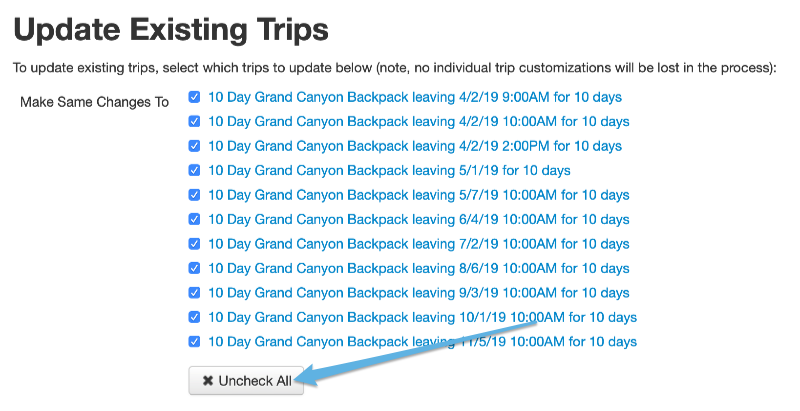
The second feature in our trip garden so far this year are some new tools to make updating specific trip dates easier to do. On the “Update Existing Trips” page, you can now “Check All” and “Uncheck All” which makes selecting a specific date range a much easier task. For our power users, you can even bulk check or uncheck a range by checking/unchecking the first date and then holding the “shift” key when checking/unchecking the last date.


(Your mouse 🐭 is thanking us right now. 😉)

And last, but not least, in our fantastic spring feature garden is a blossom we have been looking forward to. It isn’t quite in full bloom yet but it’s still exciting none the less. We are launching support for EMV chip card terminals. It’s been a long time coming but the hardware has finally caught up with the times and we have solutions that will work with your Arctic installation. The new integration will allow you to quickly process chip cards and contactless payment methods from the retail module. The feature is still in beta testing but if you are interested contact supportand we will be happy to tell you more.

That’s a wrap on our garden tour today. We hope you enjoyed it and are as excited about our new blooms as we are. Be sure to keep listening to our little birdie . He’s always tweeting about the new features popping up and will keep you in the know.

Viator Integration Comes to Arctic

That’s right folks! You heard it here first! Well actually, you heard it on Twitter first if you’ve been listening to our latest tweets. But here is where you get the grand reveal and right in time for Christmas! You all must have been very good outfitters this year. Anyway enough with the jocularity and down to serious business.

As I was saying, we have recently launched Viator Integration. The new integration will allow Viator (and, as a result, TripAdvisor) access to real time availability for trips as well as allow Arctic to receive notice of new bookings.

The integration functionality is opt-in on a per trip type basis so if you don’t offer all you do through Viator you are able to just enable the functionality for those trip types you do offer.  Once enabled, Viator will have access to basic information and availability details for all instances of the trip type.

If you are interested in using the new Viator Integration, just email us at support and we will be happy to enable the feature for your use.

Isn’t it exciting?

The Great Arctic Make-Over – It’s Foxy

If you have been to our website in the last couple of weeks, you may have noticed that we have gotten a make-over. We are super excited to unveil our new look and logo. Jess of Jess Doyle Design worked closely with us for several weeks to capture what we wanted from a new look. She did a phenomenal job and we are sure you will love the new look as much as we do.

Over the next several weeks your installations will all be updated to the new look and you can expect to see more of the new “hotness” at the AOA Conference this year.

But don’t worry, even though we have a new foxy look, you can still count on us to be the same Arctic Reservations you have come to know and love. We’re just a bit prettier. 😁

Preparing for GDPR

Going into effect next Friday (May 25th), the European Union’s new data privacy law GDPR is helping to codify consumer privacy and data protection rules. Even if you have not explicitly heard the name “GDPR,” you have probably seen some of the fallout of this rule, as companies email out updated privacy polices.

Although you are not based in the European Union, these new rules likely impact your business. As a result, it is good to have an understanding of the impacts and what you may be required to do as a result of the rules.

GDPR rules apply to any business that collects information about citizens of the European Union. If you have any EU guests reserving online or providing personal information when inquiring, reserving or registering, these rules govern such data collection and use. But even for non-EU guests, the ideas and rules set out in GDPR are designed to codify privacy and security best practices. Such practices are a good roadmap for all customer interactions; adopting and applying these practices will help gain consumer trust and ensure that personal information is carefully managed. And as other regions adopt similar privacy safeguards (California has a ballot initiative that will be voted on this Fall), the GDPR launch provides a good opportunity to review your policies and practices.

Broadly, GDPR requires that companies:

  • understand how and where personal information is collected and stored
  • develop explicit data governance policies about how they manage such data
  • have clear privacy policies that enumerate data collection, retention and related policies
  • ensure that guests provide unambiguous, granular consent for data collection
  • maintain technological best practices for data transmission and storage
  • be prepared to share collected data, discontinue data collection, and/or expunge data on a person at her/his request.

A full list of requirements should come from a more authoritative source, but these are the basics. To learn more about some of the specific details, the UK Information Commissioner’s Office has a good outline of twelve steps to prepare for GDPR.

And there is nuance to the above requirements as well. For example, MailChimp explains that pre-checked boxes do not count as consent. There blog post has other best practices for helping ensure that your email mailing list is compliant with these requirements.

Most of the rules and requirements are about company policy and governance, and so require outfitters to be careful and conscientious in how they collect and use personally identifiable information. But the rules also touch on a number of technological details.

Already, Arctic Reservations is designed to store information in a way that secures personal details, limits unauthorized use and defends against data breaches. For example, the software implements encryption and security best practices, access is controlled and logged, and security tools such as user permissions and two factor authentication are available to manage user roles.

We have begun rolling out updates to further assist with GDPR compliance. These updates will effect two areas in the software:

Customer records. GDPR ensures that individuals can request a copy of all personal information that exists, and can request that such information be deleted. A new option has been added when deleting a customer record to fully expunge data. This will remove all data regarding the customer, including even their name. Note that such an option should be applied with caution (especially with previous guests, as some information retention may be required for liability and insurance purposes); as a result, this option is only available to administrators.

Checkout and inquiry forms. The checkout form has been updated to explicitly reference agreement with the privacy policy, in addition to the payment terms and cancellation policy. Similarly, text has been added to other online forms including inquiries and registration. We recommend that outfitters add their privacy policy URL to Arctic, in the general section of the settings page.

Finally, it is worth reiterating the details of Arctic’s privacy policy. We do collect basic information on outfitters to ensure that we can provide service, issue invoices, etc. In addition, we aggregate anonymized usage information and statistics across all installations. This information helps us understand how features are used and prioritize future feature development. But we ensure that such information contains no personally identifiable information on your guests. Today, we updated our privacy policy to clarify these protections.

Note: This is our interpretation of GDPR and is for informational purposes only. Do not rely on this as legal advice or to determine how GDPR will impact your business. For comprehensive guidance, we recommend consulting with a legally qualified professional.

Exciting New Financial Report Options

We have recently made some changes to the financial report options in Arctic. These changes and options effect only the financial summary report and the end of day balance report, both of which are the best tools for accurately tracking accounting data.

The first change is to the financial summary report. It is a small but significant change and but will make accessing your preferred financial summary view easier and quicker to access. Specifically, the different modes (sales, accruals, transactions) have now been separated into individual reports. When you first access the financial summary, you are now presented with a list of these new reports. The new reports are based on the “Reporting” modes the financial summary report used previously. The four reports are Accruals, Sales, Transactions (Processed), or Transactions (Applied), although we expect to add more in the near future.

The best part of this change is that if you have a preferred version of the report, you can “star” those reports and do not need to remember to select the appropriate mode each time you run the report. The starred reports will also then appear in your “Reports” menu on the left of your screen for quick and easy access. All of these reports, starred or not, are easily accessible by selecting the “Financial” tab on the “Browse Reports” page.

You will also be able to access the end of day balance report from the “Financial” tab of the “Browse Reports” page.

There is also a new reporting mode available for the end of day balance report. The new mode allows you to export the report based on allocation date of income rather than by payment date. The biggest difference between the two modes is that with the new allocation date mode, when invoice changes are made that effecting previously collected transactions (i.e., if a reservation is changed or canceled), you no longer need to go back and re-export the end of day balance report for the date the payment was received. The new report mode will show the reallocation of funds on the date they occurred.

For instance, if you process a deposit for a trip on the 15th but the customer changes their mind and chooses a different trip on the 18th, you won’t have to rerun the report for the 15th, you will see the new changes clearly shown on the end of day balance report for the 18th. With the original mode for the End of Day Balance report, Arctic would have told you to re-export the report for the 15th because changes had been made to the income received on that date.

This new mode will make it easier for accountants to see when changes are made to the allocations of the income received on the dates those changes are made rather than having to rerun past reports to be sure they have the changes accounted for in their accounting software.

The new end of day balance report is opt-in for existing installations, and can be enabled by going to the “Settings” page under “Invoicing” and clicking the “Pencil” icon next to “End of Day Report Mode” as shown here:

If you have any questions about the new financial report options, please feel free to contact support and we will be happy to assist you.

New Simplified Syntax for Multi-Activity Emails

We have recently added new placeholders and logic to help simplify the syntax for multi-activity email templates. The new placeholders and logic make multi-activity emails easier to create and update, with less knowledge of coding, and enables you to create the email templates that list information for each activity shown on a multi-activity invoice. This is great for email confirmations, order confirmations, and invoice payment reminder emails where you want to include details about each activity on a multi-activity invoice.

The new placeholders and logic only apply to the invoice email templates, order confirmation email templates, before balance due email triggers, and after balance due email triggers.

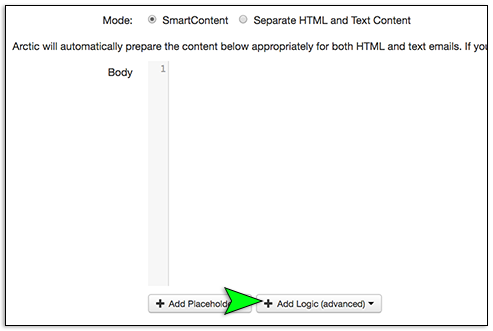
To get started, use the “+ Add Logic” button as shown here:

Under the “+ Add Logic” menu, you will find options much like the normal placeholders. Rather than just inserting a single piece of information, these options will add some logic to your template, either conditionally showing text or helping show information about multiple activities (in this case).

Under the “Invoice” category, select “Multiple Activities”. This will add the basic logic you need to your email template, allowing Arctic to loop over all activities on the invoice and print any text and placeholders inside the loop once for each activity associated with the invoice.

Here is what the initial content will look like when added to your email template:

{for_activities}
This will print for each activity. Use activity placeholders 
to add relevant information (date, time, name, etc).
{/for_activities}

You will replace the “This will print for each activity…” line with the placeholders you want Arctic to print for each activity shown on an invoice.

For example, if you want to print the trip name, start date, start time, and the number of guests for each reservation on an invoice, you will add the placeholders for each of these items inside the {for_activities}{/for_activities} placeholders, Arctic added for you (shown above).

When completed your email template will look something like this:

{for_activities}
**Trip Name:** {$trip->name}
**Start Date:** {$trip->start|format:'Date'}
**Start Time:** {$trip->start|format:'Time'}
**Guest Count:** {$reservation->guestcount}
{/for_activities}

If you need rental activity information populated, you will insert rental placeholders instead of reservation placeholders.

For more information on using the placeholders and logic, check out the support documentation. And remember if you have any questions or run into any hiccups using the new add logic tool, we are always happy to help.

A Lesson in Trigger-nometry

It’s time for a lesson in the science of Trigger-nometry. First, let me define Trigger-nometry. Trigger-nometry is the study of email triggers with the express purpose of achieving the all important Trigger Happiness. With this powerful, fundamental science, you will have all the tools you need to maximize the versatility of your email triggers; so let’s begin the lesson.

All you need to know about Trigger-nometry can be summed up by the following fundamental equation.


Now, before everyone’s eyes glaze over or some of you have a panic attack because you think you have had a close encounter with the dreaded Math and you break out the calamine lotion and paper bags, let me explain how this equation will bring enlightenment, happiness, and flexibility. This is the yoga of equations…so let’s assume the lotus position and meditate on its power, shall we?

The above equation is the foundation of Trigger-nometry and when mastered will set you firmly on the path to Trigger Happiness. This equation is almost as fundamental as such lofty notions as the Law of Gravity or Einstein’s Theory of Relativity. Are you ready? Let’s break it down.

First we have trigger, t, raised to the power of business group, bg.

This part of the equation in and of itself is a huge component towards achieving Trigger Happiness, tH.

Email triggers can obtain a huge amount of customizability and flexibility just by creating your triggers in specific business groups. By doing this, you can easily customize your triggers and word them in such ways that will emphasize the important aspects of the activities that fall within these specific groups.

However this, in and of itself, will not achieve Trigger Happiness. The last component you need to obtain Trigger Happiness is custom fields, cf.

I can already see the dawn of enlightenment. Custom fields will open the astral plane for you when it comes to email triggers.

Many of you have questioned, puzzled, pondered and noodled, how to get the triggers to be even more specific within your business groups themselves. You have meditated on how to get trip specific custom messages into your triggers when the trips are all in the same business group. Well, here is your answer.

While you could create more business group divisions and put each individual trip type into its own business group or use lots and lots of “if” statements in your email triggers, custom form fields will give you a simple and elegant solution for customizing your triggered emails.

By adding custom fields on your “Trip Form”, you can build in the specialized messages, you would want to go with each of your individualized trip types. You can use any of the field types depending on what you want to include in your email triggers. If you want most of the body of the emails to be different based on the trip type, you can use the “Long Text” fields and type all of those super specific details till your heart is content. (For more information on how to create custom fields check out the support documentation or email support.)

So let’s recap, email triggers created per business group with the use of custom fields on your “Trip Form” yields the ultimate Trigger Happiness.

That’s it. That’s all you need to know about Trigger-nometry. Easy peasy.

See…that wasn’t so bad even if it did look suspiciously like Math and you are still not convinced I didn’t just sneak some in on you. You don’t even need the calamine. 😛

The Seedy Truth About C.R.I.M.E.

It’s happened again… Those little surprise accounts… You run your reports and there they are. A few accounts you don’t recognize. Reporting, but from where? Why? What was that for? The memory is foggy. You just can’t quite figure it out. You’ve been bamboozled… You’ve been hustled… You’ve just had an experience with C.R.I.M.E. (Crummy Random Irritating Mystery Entries) perpetrated by your own staff, maybe even yourself. Commence the weeping, wailing and gnashing of teeth.

Once you have collected yourself and gotten over the shock of the C.R.I.M.E.’s committed against you, know that Arctic is here to save the day. That’s right, Arctic has added a new feature to help fight C.R.I.M.E.

Invoice Editing Restrictions

Ideally, invoices reflect charges and fees of activities and retail items as they were set up, and those are in turn reported to the specific accounts they are assigned to. This removes the need to directly edit these charges on the invoices themselves, and keeps things well organized and trackable. Arctic does all the work. Reporting works well. This is the recommended approach for activities and retail items. This is L.E.G.A.L. (Legitimate Entry Good Accounting Love).

For all of those charges that fall outside the norm and can not be handled by the default pricing levels and discount rules, item templates are the solution. Using item templates is a wonderful way to help your record keeping by giving you a reliable accounting structure when a specific charge or fee is added. This also keeps things organized and trackable. Again, Arctic does all the work and reporting works well. This is the recommended approach for these types of miscellaneous charges and discounts. This is also L.E.G.A.L.

When a miscellaneous charge is added directly to an invoice not using an existing item template and an account is not specified by the user adding the charge, Arctic will do its best to account for the the funds associated with the new charge. However, this gives Arctic insufficient data to accurately track the funds and the account where they should go, which leads to the creation of a new account. Arctic does its best with the data it is given, but unless an account is explicitly selected, new accounts will appear. It’s trackable, but messy. This is not recommended. In fact, this is a C.R.I.M.E.

In an effort to fight C.R.I.M.E., Arctic has instituted invoice editing restrictions that prevent users from being able to add custom charges and discounts or directly edit activity charges on invoices. Super users and administrators can still add custom charges and discounts as well as directly edit activity charges on invoices.

In the war on C.R.I.M.E., Arctic has been deputized to keep your accounting structure S.A.F.E. (Secure Accurate Fit and Effective).  As the new Sheriff in town, Arctic has automatically implemented the new restrictions on your installation.

However, if you would prefer to police your data entry on your own and wish to allow your users to edit invoices and are not worried about having rigidly clean accounting, you may tell Arctic that you do not want it to fight C.R.I.M.E. on your behalf.  To relieve Arctic of its badge, you can change the settings to allow users to add custom charges and discounts and directly edit activity charges on invoices.

To disable the new restrictions, head over to the “Settings” page under the “Invoicing” section and click the “Pencil” icon next to “Restrict Editing.”

On the “Configure” page, there are two settings. One for custom items and discounts, and one for activity charges. You may disable one or both of the restrictions per your preference.

Once you have set your preferences, click “Save Settings” to save your changes.

If you have any questions about Arctic’s war on C.R.I.M.E., feel free to contact support and we will be happy to help. In the meantime, know that Arctic is doing all we can to keep your accounting structure S.A.F.E.

Ten New Features You May Have Missed

Over the last year, Arctic has introduced many new features as part of our regular and ongoing updates. We try to announce new features on Twitter, but we know that it can be easy to overlook those updates, especially in the bustle of the busy season. So we want to highlight some updates, big and small, that you may have not have noticed.:

1. Moving payments

It is now possible to move credit card and e-check payments between invoices. This can come in especially handy, if you have a group leader who uses the group booking link to make a second reservation for themselves despite the fact they already have one and just needed to make a payment. (We’ve all been there. 😁) Now you can easily move the payment from the second reservation to their first reservation without any fuss.

You can find out more about how to move credit card and e-check payments in the the new documentation on the feature.

2. Moving reservations in and out of group reservations

Oh yeah, you’re excited now. No more acrobatics to fix reservations of guests who somehow managed not to use the group booking link to make their reservation. (I think I hear singing. 😋) AND you can also easily move a reservation out of a group if someone will not be able to go with their group, but wants to reschedule rather than cancel.

Check out the documentation for more about this awesome feature.

3. Notices in the toolbar emails and activity log notices

In an attempt to make it easier to know when you have emails or activity log notices that require attention, we have added notices for both of these things to the top toolbar of your Arctic installation.

Now, you can tell, at a glance, if there are any emails or log notices that require attention and easily access them by click the notices shown above.

4. Emoji support

Arctic now supports Emoji’s for emails, notes, trip descriptions, item descriptions etc. So express yourself! 😻 😹 🙀 🙉 🙈 🙊

5. Find item template usage

Ever wonder how many of a particular discount were given or how many of a particular item charge or fee were added to an invoice? Well now you can easily get usage information for each item template.

To check the usage for an item template, go to the “Settings” page under “Invoicing” and click the “Pencil” next to “Manage Item Templates. On the “Browse Item Templates” page, choose “Find Usage” from the “Tool” menu next to the item template of your choice.


6. Overview report enhancements

The overview Report has received a few upgrades that are super helpful. First you can now drill down into the figures shown on the report to see the relevant records that make up the figure shown in a particular cell. Also the overview Report now displays add on information. This will allow you to see how many optional items and add-ons you sold during the season so you can hone your offerings by focusing on the things that are the most popular.

7. Manage and clean old retail terminals

If you have old and unused retail terminals on your installation, Arctic recently added the ability for you to be able to remove them. To remove an unused terminal, go to the “Retail” menu and choose “Terminals”. On the “Browse Terminals” page, click “Delete” next to any terminal you wish to remove.


8. Booking agent access to registration and waivers

Now booking agents can login to their guest portal to see all of their active bookings. From the guest-facing site, the booking agent can invite guests to register and sign waivers. Or if they prefer a more “white glove” approach, they can complete their guest registrations and download waivers to send to their guests for paper signatures. The booking agents can also pay their invoices online as well.

For more information on guest portals for booking agents, check out the documentation on the new feature.

9. Provide a PDF as the paper version of your online waiver

Arctic has now added the ability for you to upload your own PDF version to use as the paper waiver for each online waiver you create in the system. This allows you to control the layout and design of paper waiver rather than relying on the Arctic generated PDF for those guests who prefer to return a paper waiver rather than signing online.

To upload a PDF to use as the paper version of your waivers, go to the “Settings” page under “Online Waivers” and click the “Pencil” next to “Manage Waivers”. On the “Browse Waivers” page, choose “Edit” next to the waiver for which you wish to upload a PDF.

On the “Update Waiver” page, scroll down under the waiver content box to the “Paper Version” section and choose “Upload” and then select the PDF file you want to use.

Once the file is selected, scroll to the bottom of the page and click “Submit” to save your changes.

10. Easily create multiple trip start times per day

We have added the ability to easily create multiple start times per day when creating trips. To use this feature, go to the “Create Many” page and choose “Multiple Start Times Per Day” and then enter each time the trip runs.

These are just some of the great features we have added recently and we are always adding more; so don’t forget to keep checking our Twitter feed where we announce all of our most recent updates and newest features.

If you have any questions about any of the features showcased above or need anything else, be sure to contact support, we are always happy to help.