Arctic Reservations at AOA Conference in Daytona Beach

Arctic will be attending the American Outdoor Association Conference this year in Daytona Beach. As usual, we will have a booth (#319) and love the opportunity to talk with outfitters from near and far. Whether you are new to Arctic, a long-time user or just vaguely know what Arctic is, stop by our booth and say hello.

For existing users, we have some one-on-one time slots where we can help provide guidance on getting the most out of your software. Look for our newsletter to reserve such a time slot.

And for outfitters considering Arctic for their reservation management needs, we can provide a guided walkthrough of the software, showing how it may support your business’s needs.

In light of the venue for this year’s conference and the damage done by Hurricane Matthew, Arctic will be donating to the American Red Cross and Roots of Development to aid in the recovery in Haiti, Florida, Georgia and South Carolina.

New Usage Management Features

We have been excited to see our outfitters embrace video and photo sharing and using new email notifications to maintain closer contact with guests. We want to continue to encourage use of these features, but they place a substantial burden on the system with close to a million photos and hundreds of hours of video being stored today. As a result, we will need to introduce usage-based pricing to help cover the increased load generated by particularly large collections of photos and emails. Starting on January 1, 2017, Arctic Reservations will be introducing usage-based pricing. The majority of outfitters will see no change in their monthly charges. All affected outfitters have already received email notifications and can see estimated charges on their invoices. For those that do see an additional usage charge, we aim to keep the pricing manageable and will be adding some new tools to help you reduce usage as needed or desired.

When the new usage tools go live, you will be able to access them by going to the “Settings” page under “General Settings” and clicking the “Pencil” icon next to “Usage”.

Step 1

On the “Usage” page, Arctic will display all of your current usage statistics. At the bottom of the page, you will find two buttons, a “Clean Social Sites” button and a “Clean Photos For Sale” button.

Step 2

When you click either of these buttons, you will be able to specify a date and Arctic will remove all social sites or photos for sale for trips prior to the date that you entered. By default, Arctic will choose a date one year prior to the current date. You can alter the date to be any date you prefer.

Step 3

Once you have selected your date, you will be able to then review your date selection before permanently deleting the social sites or photos for sale.

Note: Once the photos or social sites have been cleaned, they cannot be recovered. All content will be permanently deleted.

As mentioned, these tools are still in development but should be live by the end of the month to give any effected outfitters plenty of time to manage your usage before the usage-based pricing takes effect in January. We will announce when the new usage management feature goes live, so keep an eye on our Twitter feed on your dashboards.

With the usage tools provided, you will be able to easily maintain your usage within an acceptable range of expense for your installation. If you have any questions about the usage-based pricing or how to use the usage management tools when they go live, please feel free to contact support and we will be happy to help.

Arctic’s New Cross Promote Feature

cross-promoteRecently, we launched a cross-promotion feature that provides a simple way to help guests identify other potential activities or services of interest, and to increase online sales. The cross promote feature allows you to highlight additional trips, rental items and e-commerce categories once a guest has added an item to his or her cart. With this feature you can, for instance, cross promote camping or cabin rentals with your rafting or zipline trips. You can also promote an e-commerce category that includes guide books, maps, and waterproof bags that you offer in your e-commerce stores to help guests prepare for their upcoming trip. You can even cross promote other tours. For instance, you can suggest a zipline or rock climbing tour in addition to the rafting trip already selected by the guest.

This feature allows you to suggest other offerings to the guest during their online visit by making them aware of the other services or items that you provide that are complimentary to their current selection. The cross promote feature works differently from the package feature in that no discount is required to be offered on any of the activities that are cross promoted, and you can use it to promote e-commerce categories.

When using the cross promote feature, keep in mind that you do not want to promote too many other options as this can overwhelm guests with choices and may hurt conversion rates for guests moving through the checkout process. I would recommend adding no more than three options to any given trip, rental item or retail item. Also note, if you are using the package feature, you should avoid selecting the same items to cross promote as both will be displayed and may be confusing.

For more information on how to use the new cross promote feature check out the support documentation and, of course, feel free to contact support with any questions.

The Great Procrastinator Hunt

Today I want to point out one of the new email features that has been added to Arctic which will help ensure you get all the needed information and forms from guests. We have recently added a couple of new email trigger options called “Before Trip – Missing Details” and “Before Rental – Missing Details”. These new trigger options will allow you to specifically target guests who are missing registration information or have not signed their waivers.

Img 1

You all know what a chore it can be to collect all of the necessary information and how much time and energy it takes from you and your staff to track down guests who have not filled out their forms. These triggers will help with that. Now, you can allow Arctic to automatically message your procrastinating guests and urge them to complete their registration and waiver before arriving. You can create as many of these triggers as you need.

The beauty of the “Before Trip – Missing Details” and the “Before Rental- Missing Details” triggers is that they will only be sent to guests who are either missing registration information, have not signed their waivers, or both, depending on how you configure them.

Img 2

This means you are not bothering the guests who completed their forms months ago when they made their reservations — your audience will only be the procrastinators. The “oops, it slipped my mind procrastinators” will most likely complete their forms after the first trigger but the “procrastinators of epic proportions” will get as many reminders as you care to generate. You might not want it to look like the scene out of Harry Potter where there are letters everywhere and owls overpopulating the neighborhood, but then again, for the really bad procrastinators that might be what it takes. 😛

Each “Before Trip – Missing Details” or “Before Rental-Missing Details” trigger can be worded specifically because your target audience will only be the guests who are missing details. Each subsequent reminder can also have the tone increase in urgency as the activity start dates get closer.

Bottom line; this will be a great way to remind your guests to complete their forms which should reduce the amount of paperwork that has to be completed upon arrival so your operations can run smoothly for you and your guests. And best yet, Arctic is doing the heavy lifting and will seamlessly and effortlessly track down your wayward procrastinators for you. It’s a beautiful thing. 🙂

The results are in…

The results are in and your votes have been tallied. Given the number of different ideas developed internally and suggested in our interactions with our faithful outfitters (that would be you), the survey gave us a great way to get everyone’s input to help us focus our ongoing development to ensure new features are as widely useful as possible and we continue our tradition of being a user driven software. Based on the survey results, our priorities for the new features in the coming months will be on the following functionality.

So without further ado here is the 2016 development plan! (And the crowd goes wild… Ok, so that’s overboard, but you should be excited.

  • More accounting reports, including cash flow projections: This was the most requested feature and is something that we will address soon. We have a number of new reports already in the works, including a cash flow report, a minor update to the end of day balance report and new reporting features to more easily access important date ranges. And, although not exactly an accounting report, based on conversations with outfitters at the AO conference, we will be introducing a report akin to the overview report from Version 1.
  • Revamped discount and promotions (easier setup, e-commerce support, more control): The current system for managing discounts and promo codes, although functional, has some key limitations and is not entirely intuitive. We are going to work to improve this process by creating a more streamlined interface, adding support for one-time use codes (like those used by Groupon or LivingSocial), adding support for better per-guest promotions, adding support for per-add-on discounts and expanding discounts to other areas, such as photo sales and e-commerce sales.
  • Up-sell items online, such as recommending additional trips or retail items when reserving a trip: Outfitters have expressed an interest in being able to cross-promote items on the guest-facing site. For day trip operators, this may mean suggesting complimentary trips or camping sites, while for other outfitters, this may mean promoting retail goods that will be useful during the trip. We are planning a cross-promotion feature that allows defining related and recommended items that will be shown after adding an activity or item to the cart.

We are tremendously excited about these new features, as well as some other ones that we have been working on internally, that will be launching over the coming months. We expect some of the features to be available in the very near future and we are aiming to have versions of all of them ready at the beginning of the summer season. We will continue to refine and polish the features as they are deployed.

We’ll call out some of the features in our newsletter and blog, but we recommend following our Twitter feed, as we provide timely notifications of new features and other important updates. (By default, our tweets appear on the Arctic dashboard.) If you have been following our feed recently, we are highlighting a number of updates that were recently deployed. It’s a great way to learn about new features and tools in the system.


AOA 2015 – What a Crazy Ride!

As many of you know, we just completed three whirlwind days at the American Outdoor Association’s annual conference in beautiful Salt Lake City. We had an excellent time and saw many familiar faces, which is always fun. We also had a fair number of new outfitters approach us, due in large part to the high praise and word of mouth referrals you all provide, for which we are truly appreciative.

As many of you saw, our booth was a bustle of activity from before the show opened until well after they drove us out. 🙂 We were excited to hear your feedback and ideas, as well as to hear some of the inventive ways some of you are using Arctic. Each outfitter has done a tremendous job of taking and making Arctic their own.

If you weren’t able to attend this year’s conference, we always want to hear from you so be sure you pass along your feedback for future features in your 2016 Development Priorities Survey. The survey will be open through the end of the month. After the new year, we will tabulate the surveys and summarize some of the key trends and priorities that we anticipate going forward. In the meantime, as expressed before, we hope that you all have a great holiday and wonderful new year.

Tis the Season to Optimize…

As some of your seasons are slowing down and some of your seasons have yet to kick into high gear, now is the opportune time to look at tweaking your Arctic configurations or incorporating features you haven’t previously been using or refining your use of the features you are already using. Whether you are looking to clean up your account structure for more efficient bookkeeping, implement packages, begin accepting on online waivers or tweak your evaluation forms, we are here to help.

All of these features will help you manage your business and customer relations through Arctic more efficiently and successfully. Most of these optimizations are small tweaks and can be done simply but if you want to throughly clean house and get the most bang for your Arctic buck, then you may want to consider an on-site consultation. With an on-site consultation, one of our staff will visit your office, learning about the specific challenges you face and giving you guidance on the best ways to use Arctic Reservations to help with marketing, sales and operations.

Now is also the time to ask those nagging questions and get advice about things that may not have gone as smoothly as you wanted them to this last season. If you feel like there are gaps in your reservation or rental process, let us know what your challenges are. Most of the time we can provide multiple options for handling the challenges presented from your particular business and then you can choose the one that works best for you and your staff.

Remember the “?” is your friend. Send in your requests and let’s optimize.


New Evaluation Follow-Up Email Feature

We have recently added a small but handy feature to Arctic. It is the ability to send evaluation follow-up emails to your guests who take the time to complete your evaluation forms. This feature gives you the ability to set up multiple email templates that you can use to send to your guests after they complete their evaluations. These emails, like all other email correspondence sent to guests from Arctic will be stored on the “Email” tab of their “Person” record for easy reference should you need them again in the future.

In many instances, when setting up the templates, you will want to leave the templates mostly blank pulling in only a small amount of “automated” information from the placeholders so that you and your reservationists can then personally address the feedback, good and bad, submitted by your guests. Arctic provides placeholders for pulling in basic reservation information for the guests as well as placeholders for the recipient and sender so that you can create personalized greetings and signatures for the emails.

The follow-up emails are sent from the “View Response” page. If you have multiple templates set up then Arctic will allow you to choose the template you want to use.

Step 20-A

To set up Evaulation Follow-Up email templates, go to the “Email” menu and choose “Templates” on the “Browse Templates” page, scroll down to the “Evaluation Follow-Up” section and click the green “+ Setup Template” button.

Step 20-B

If you have any questions or need help setting up an evaluation follow-up template, feel free to contact support and as always we will be happy to help.


Email List Integration: More Fun than a Barrel of Monkeys…

Well, more useful anyway. 🙂

Are you tired of having to keep up with the new clients who have subscribed to your email list, entering them in both Arctic and your email marketing provider? Then you will be delighted to learn that Arctic, coupled with Mailchimp, can do this tedious and annoying task for you. By using the Email List Integration feature in Arctic, you can keep your Arctic contacts and your email marketing lists in sync. When a guest is added to Arctic and subscribed to your list, Arcticwill send her/his email information to Mailchimp to ensure that they are part of your email list (but don’t worry, it will only add them if they are not already on the list). This process also works in reverse, if you use a subscription widget on your website where guests can subscribe to your email marketing list, Mailchimp will send new subscriber information to Arctic. If the email address is associated with an existing customer in your Arctic database, Arctic will update his/her email subscription information. If the email address is not associated with an existing record in your customer database, Arctic will not add the email address as a customer record since these entries are most often just email addresses and do not include names or other pertinent information. This also ensures that your Arctic database is only filled with guests who are either solid customers or solid inquiries and is not polluted with entries for those people who are only tangentially interested. The same works for un-subscriptions. If a guest unsubscribes from your email list, Mailchimp will send this information to Arctic as well which will then unsubscribe the guest from the “Email List”. If you select “No” in the drop down menu for the “Email List” field for a guest who was previously subscribed, Arctic will also send this un-subscription information to Mailchimp.

When setting up the mail integration between Arctic and Mailchimp, it is a simple process. However, Arctic and Mailchimp will only manage future mailing list data, all past mailing list information will not be transmitted. To sync Arctic and Mailchimp initially, we recommend that you run a filter of your Arctic database that will pull all of the guests currently subscribed and then import the results into Mailchimp. Again Mailchimp, will only import new email addresses to avoid duplication. This will ensure that your Mailchimp database has all of your current Arctic information and the integration can start keeping Arctic and Mailchimp in sync.

To set up email list integration, go to the “Settings” page under “Integration”. There you will be able to link your existing Mailchimp account or set up a new Mailchimp account to link to your Arctic installation.

If you are settting up a new Mailchimp account you can easily import your marketing database from your old mail marketing service into Mailchimp. Once you have imported your existing mail marketing list into Mailchimp, then import the list of existing Arctic customers who are currently subscribed to your mail marketing list. Once you have this completed, Arctic and Mailchimp will start automatically managing the new list subscriptions and unsubscriptions and you can rest assured that your marketing list is up to date. For more information, on setting up Email List Integration or for an example of the filter for exporting your current Arctic guests who are subscribed to your email list, see the “Email List Integration” chapter of the support documentation and as always if you have additional questions or run into any hiccups getting the mail integration feature set up, feel free to contact support and we will be happy to help.

The New Improved Create Request Form

So here I am sitting, staring at the computer, waiting for my muse to inspire a witty and fantastic post to tell all of you about the updates on the “Create Request” form. I sit………. and I wait……….. and I wait……….and I sit………………You get the idea. Apparently she has taken an extended vacation because I just am drawing a blank or only coming up with things that are more lame than my usual fare. For instance, I was going to use a sports analogy but got bogged down in the details (The Pitcher throws the puck to the Quarterback who tackles the Goalie who wins the game. Something like that anyway…….)  Then there was the Underwear Gnome knockoff (Step 1. Problem. Step 2. “?” Create Request? Step 3. Solution!). There was also the very un-perky cafe barista scenario; but that got over frothed and foamed all over the place (Incredibly messy, BTW. Have you ever tried to clean milk froth out of a keyboard? Trust me.It isn’t pretty.) I even tried popular TV and movie analogies ranging from the Mentalist and the Big Bang Theory to the Wizard of Oz (If I only had a brain….) and Star Wars (Luke, I am your Tech Support…..). All of which never even made it off the keyboard.

To be honest, I am at a loss to come up with a way to make this post witty and fun. The muse is definitely broken. I guess I don’t pay her enough. Sooo, you will just have to deal with the dry, bland and straight to the point post. It’s going to be like eating brussel sprouts. It’s not pleasant; but you know they’re good for you, so hold your nose, chew quickly and it will all be over before you know it……..


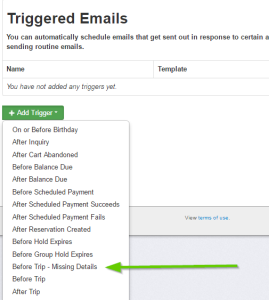
In an effort to increase efficiency in the support process, we have recently updated the “Create Request” form on your installations. The “Create Request” form will help prompt you to provide the details we need to be able to quickly assess the situation or issue you are experiencing so we can get you back up and running as quickly as possible.

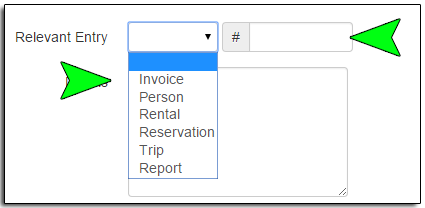
The newest addition to the “Create Request” form is a field called “Relevant Entry”.


Relevant Entry

There are two parts to this field. The first part is the drop down portion. Here you can choose a category for the problem you are experiencing or for the question you have. You can choose from Invoice, Person, Rental, Reservation, Trip or Report. These categories communicate the nature of the problem or of your question which is extremely helpful especially if there isn’t a corresponding activity or invoice number for the problem or question you have.

Part two of the “Relevant Entry field is the “#”. If the issue involves a specific activity or invoice and you can provide the activity number or invoice number in the “#” box. These numbers give us an immediate starting place for our investigations into the issue at hand. Having a starting point or an example that we can look at gives us a huge leg up in tracking down glitches and bugs. Now, if you can provide both a category and a reference number, that is even better. 🙂

Details

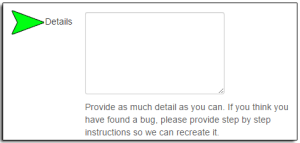
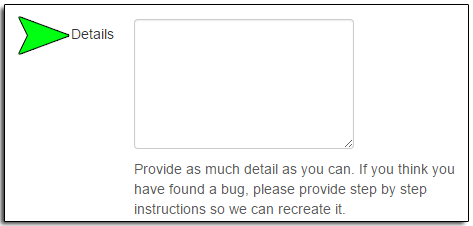
The “Details” field is an “oldie but a goodie” as they say. (Ever wonder who “they” are? Hmm…topic for another day, I suppose.)  In the “Details” field, providing us with as much information about the issue or problem as possible is extremely helpful. You can use this field to paste the text of any errors you are getting that are preventing you from saving a change or progressing to the next step in any process. Or if you are getting an error about the content of an email template you are creating, you can copy and paste the content of the email template into the “Details” field. This gives us a chance to look at exactly what you have so we can help find the reason for the errors. Especially because small things can be the culprit when it comes to email templates; a missing curly bracket, an extra space, etc. can all wreak havoc. Having the text you have for us to look at really helps track those pesky details down.

Attachments

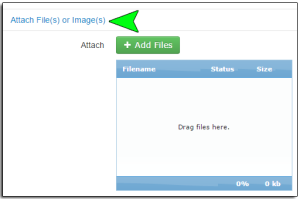
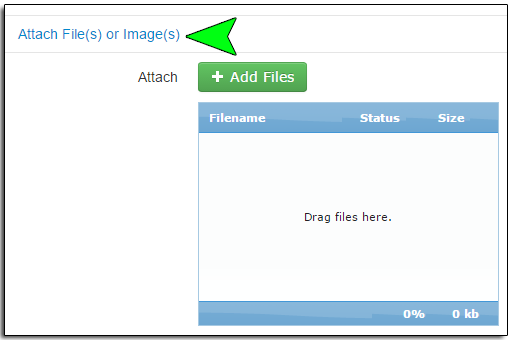
Last but certainly not least is the attachments field. As they say (may “they” forever live in infamy), a picture is worth a thousand words. Screenshots are also incredibly helpful again because it allows us to see what you are seeing. You can also attach any other relevant documents like invoices. Again being able to “see” what’s up is key to solving many of the mysteries that are baffling the mind and defying logic or rather just being really annoying when you are already busy. 🙂


Ok. It’s over. Phew, I didn’t think we were going to make it there for a minute. Hopefully, next time I can coax the muse to come back to work and the witticisms will flow freely from the keyboard once again. :p
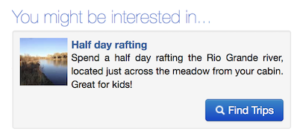